Showing posts with label baking. Show all posts

20 December 2010

Christmas Recipe - Hand Cream

Okay, so I know the idea here was most likely food recipes, and actually I do have a recipe I make every Christmas, so I'll put that here, too.  But first, the hand cream!  I was amazed at just how easy it is to make your own creamy, soft, yummy-smelling hand cream!  I found the recipe here. Just like the person in that post, I ordered the supplies I needed from Mountain Rose Herbs. Once you have the ingredients you need, it is quite economical to make, too.  I used half-pint Ball canning jars to package it.  I found some wide-mouth ones, which are perfect for the lotion! The recipe makes enough to fill 2 of these jars.

Here's the recipe:
  • 1 1/4 cup hot water
  • 1/4 cup emulsifying wax (I got mine from Mountain Rose Herbs)
  • 1/4 cup olive or coconut oil (refined will keep the cream from smelling of coconut!)
  • 24-36 drops essential oil (I got these from Mountain Rose Herbs, but had one I bought at my local health food store a couple years ago, too.)
Directions: Combine oil and wax in glass measuring cup and microwave on high for 1 minute, or until all the wax is melted.  Add the essential oil drops to this mixture and stir.  While you are doing that, microwave the water for 1 minute.  Add the wax mixture to the water (it turns the creamy white color at this point), and then pour the hot lotion into jars.  Let cool overnight and then enjoy!

The link to the original recipe also has a printout for jar labels, but I wasn't terribly fond of them, so I made my own in Microsoft Publisher.

Now for the food recipe!  Every Christmas morning, I make my grandmother's cinnamon rolls!  They are the most yummy rolls in the world! They are a bit time consuming, but worth every minute!  I actaully make mine the night before, roll them out and put them in the baking pan the night before.  I leave them in the refrigerator overnight (covered) and just let them come to room temperature in the morning before baking them. Top these with your favorite cream cheese frosting, and they are amazing!

A quick funny story about these though, especially since one of my college buddies Tina wanted to get the link to the lotion, and she would remember this!  The year after I graduated from college, Jerry was gone for a weekend on a business trip, so I invited some of my dorm mates to come stay at my place for the weekend.  I was so excited to be the keeper of my very own home and wanted to make amazing home cooked meals for my still-eating-dorm-food friends.  I decided to make this recipe for breakfast Saturday morning, but I had never made it before.  I had never made any yeasted bread recipe before for that matter! (Joanna, we should have experimented with yeasted bread instead of making so many variations on the green and purple swirly cake when we were in high school!) Anyway, it went very badly.  I didn't know how to knead dough very well.  I used my kitchen aid (which was brand-spanking-new at that time!), but the dough seemed so wet!  I kept adding flour, and by the time they rolls were completely done, they were like cinnamon rocks.  I think we ate cereal instead! :)

Grandma's Cinnamon Roll Recipe
  • 3 eggs
  • 1 cup milk
  • 1 cup sugar
  • 1/2 cup oil
  • 1 stick butter
  • 1 pkg. yeast (2 1/2 tsp)
  • 1 cup warm water
  • 7 cups flour
  • pinch salt
Mix together eggs, milk, oil, and sugar in bowl.  In another bowl, combine flour and salt.  Make a well in the middle of the dry mixture.  Stir yeast and warm water and mix with the flour in the well.  Sprinkle with a little sugar.  Once yeast is active, beat in the wet mixture and soft butter.  Knead until the sides of the bowl are clean.  Let rise until double.

At this point, this dough can be used to make doughnuts, or continue to make rolls.  Roll out dough into large rectangle and spread melted butter over the top.  Top this with a cinnamon sugar mixture, and add nuts and/or raisins if desired.  Roll up lengthwise and press the edge to seal.  Cut into 12 rolls and arrange in a 9X13 baking dish.  Allow to double in size again.  Bake at 350 for 20-35 minutes (depending on the degree of doneness you like.  I like mine soft.)  Top with cream cheese frosting while still warm, and enjoy!

14 January 2010

Anna's 1st Birthday Cakes

I got the idea for these cakes from here.  Obviously, mine look a little different from those cakes, but I like the way they turned out.  This one is the mini-cake for Anna.

And this is the big cake that everyone gets to eat.

Between the two of them I used nearly 4 cans of frosting.  Talk about a sugar overload!!!

It's not my best frosting job ever but I think they're cute.


10 October 2008

Pumpkin, Pumpkin, Pumpkin

As soon as Joanna put up her post for Pumpkin Scones, and at the same time Pioneer Woman had up posts about making pumpkin puree and pumpkin butter, I knew I had to try some pumpkin things here! I have never made my own pumpkin puree - I always just buy a can at the store! But I was feeling adventurous and decided to go for it.

I started by cutting up the pumpkins (I got sugar pie pumpkins) and scraping the pulp and seeds out. I was so excited about this project! So imagine my dismay when I opened the second one and found this:

Rotten!! I was especially horrified because I bought these pumpkins at Whole Foods when I was in another part of town for a meeting. I wasn't about to drive 40 minutes back to Whole Foods for my refund, but man was it tempting. These pumpkins weren't cheap! So I only got to roast one pumpkin. After it roasted, I pureed it in my food processor.

I immediately made Pumpkin Butter. I love it - so yummy. But the recipe makes so much more than I thought it would. And it had too much sugar and not enough pumpkin or spice, for my liking anyway. Look how great this turned out:

Don't you just want to take a big bite of that toast right now? Actually, I wish you could. I'll never finish all this pumpkin butter before it goes bad. Do you think I can freeze it? I didn't know with the yogurt in it if it would freeze okay or not.

If you are wondering about the yield from one pie pumpkin, I used about 1 1/2 cups for the pumpkin butter, separated out the 1/2 c up I'll need for Joanna's scone recipe, 2 cups to make my favorite treat which is basically pumpkin pie filling cooked in an 8X8 glass dish without a crust. I serve it up in squares with fresh whipping cream on top! Mmmmm...and I don't feel so guilty about eating it, since without the crust it is fairly healthy. It's a vegetable, right? Anyway, after portioning out all of that, I still had 1 1/3 cups left.

So, in total, I got 5 1/3 cups of puree. The pumpkin butter is good, but the real test for me will come when I make the pie filling. I want to see if the flavor/texture/quality is really better. Enough that it could justify the extra cost and work from buying canned. If I do think it is enough better, I am going to try some larger, cheaper varieties of squash to see if I still like the results. I did some research, and it seems that most canned pumpkin is actually butternut squash! Who knew?

Of course, I saved the seeds and roasted those up, too. Wow, are they tasty. How long do you think this one, small bowl will last??? I really needed that second pumpkin!

17 August 2008

Best Blueberry Muffins


Best Blueberry Muffins

Note: This recipe does not require a standing mixer, but when making the batter be sure to whisk vigorously. The batter will be lumpy and bits of flour in it in the end is fine. Just be sure not to OVERMIX the batter.

2 cups unbleached all purpose flour
1 tablespoon baking powder
1/2 teaspoon table salt
1 large egg
1 cup granulated sugar
4 tablespoons unsalted butter, melted and cooled slightly
1 1/4 cup sour cream
1 1/2 cup frozen blueberries, preferably wild

1. Adjust oven rack to middle position and heat oven to 350 degrees. Spray standard muffin tin with nonstick vegetable cooking spray.

2.Whisk flour, baking powder and salt in a medium bowl until combined and set aside, In another medium bowl whisk egg until well combined and light colored, about 20 seconds. Add sugar and whisk vigorously until thick, about 30 seconds, add melted butter in 2 to 3 steps whisking to combine after each addition, add sour cream in 2 steps whisking just until combined.

3.Add frozen blueberries to the dry ingredients and gently toss with hand to combine. Add sour cream mixture to dry ingredients and fold with rubber spatula until batter comes together and berries are evenly distributed, 25 to 30 seconds (small spots of flour may remain and batter will be thick) Do not overmix.

4.Use and ice cream scoop or large spoon to drop batter into greased muffin tins. Bake until light golden brown and toothpick or skewer inserted into center comes out clean, 25 to 30 minutes, rotating the pan halfway through baking time. When done, let cool on wire rack, add butter and ENJOY!

08 August 2008

Cristopso...No Wait

I bet you all are breathlessly sitting on the edge of your seats waiting for me to tell you how my bread turned out. Ahhhh, it's so nice that you guys care about me and my kitchen adventures so much. I really appreciate it. I feel loved. You guys are the best!

Well, as with the first time you make any recipe, especially bread, there were many mistakes. Like I forgot to buy the dried fruit and nuts that make this bread Cristopsomos and not just plain Greek celebration bread. So...it's just plain ole Greek celebration bread. The other thing that I forgot was bread flour. I think this was a biggie. Since I only had all-purpose flour, my kneading time was doubled from 10 minutes to 20 minutes. It didn't help that I did have to stop several times and help Ella with the names of the phases of the moon.

My poolish - I dig that word...poolish; doesn't it sound so funny. It makes me giggle - looked like this after it had fermented for about 4.5 hours. I left it in the fridge over night and it looked like sticky snot the next morning. Interesting stuff this poolish.

Here's my bread. It flattened out some and I think that's because 1) my boule wasn't tight enough and, 2) I put those silly...dough decorations on it. I should have left them off.

I had to knead into the dough at least one cup of flour beyond what was called for in the recipe. It was very sticky; un-kneadable. For this reason, my bread was dry. Tasty, but dry. It would have been better with the fruit and nuts in it and the glaze was just downright crazy. It made the top of the bread so sticky that you could hardly handle it. I wouldn't do a glaze next time. Since it was so dry, I cut it in half and froze one half and made some T-A-S-T-Y French toast with the other half. Yummy.

I'll definitely be giving this recipe a try again.

06 August 2008

Christopsomos - Greek Celebration Bread: The Apprentice Begins

I love making bread. For my first real venture into The Bread Baker's Apprentice, I've decided to make Greek Celebration Bread. It's the third picture down in the link provided. The bread has all the lovely spices from the Middle East/far eastern Mediterranean that I am just beginning to have so much appreciation for like cinnamon, allspice, cloves and nutmeg.

The bread includes not only commercial yeast, but a sour dough-like starter called poolish. The poolish is basically flour, water and a bit of yeast set out to ferment for 4 hours and then used in the recipe. He calls this a wild-yeast starter. Here is an exciting and titillating picture of my poolish.

Wish me luck. Tomorrow will tell if my bread is a success.

02 May 2008

The Inspired Cheesecake

Apparently my comment on my fabulous cheesecake wasn't good enough and Johanna wants to know more details. To accomodate her I thought I'd take a picture and everything. Aren't I accomodating?

I did read Alton's method thoroughly, and if I had made his cheesecake exactly I would have used his method exactly, because I didn't think it sounded that hard, but I didn't. I used, part of his method, the Cuisinart method and the Splenda recipe. I mixed the cream cheese, vanilla, sugar, eggs and flour in my food processor one ingredient at a time and it made this really smooth batter, oh, it looked so yummy. Then I put all that into a bowl and hand mixed the milk in and then I did my usual and didn't read all the directions so I just mixed in the dulce de leche to the whole batter. It still turned out really well; instead of swirls of dulce de leche, the whole thing has the caramel-y flavor. The cheesecake is smooth and delicious, with no cracks in it.

Things I think I did to avoid a crack: water bath and after it was done baking I turned off the oven, loosened the cheesecake from the sides of the springform pan and then left it in the oven with the door open until it was completely cooled.

01 May 2008

Who Really Cares How Many Posts We Have Titled "Inspiration"

My evil plan worked. OK, maybe it wasn't evil, but it still worked. Inspiration is blooming like May flowers!

Johanna posted about her cheesecake birthday cake the other day. You know I've never made a real cheesecake before? I've made cheesy ones (no pun intended) with Tastefully Simple add-ins that are no bake, that's it.

I really, really like cheesecake. I mean, I *really* like cheesecake. If there is anything in the world to waste calories on, cheesecake and chocolate are the ones that first come to mind. I figure if I'm going to consume empty calories I might as well do it right. Hearing that Johanna was making her own cheesecake made me head to the pantry to see if I had the materials.

I had everything but dulce de leche. Do you even know what dulce de leche is? I have a vague notion in my head that it's something like caramel so I was tempted to just use some ice cream topper we had, but as I'm becoming a real cook (hahahahahahahahaha) I decided to try to find out how to make my own.

Ready? Go to your pantry and get out a can of sweetened condensed milk. Now put it in a big pot. Fill your pot with water until it totally covers the can of sweetened condensed milk. Put this on the stove and bring to a boil. Turn the temp down and let the can sit in slow boiling water for about 2 hours. The only thing is to make sure that the can never gets uncovered because I'm told it could explode...and that would be bad, so add warm water as needed. Let the can come to room temperature before opening and wah-lah, dulce de leche.

I don't have a mixer so I thought I wouldn't be able to make a cheesecake but I do have a food processor and that worked beautifully!

My dulce de leche cheesecake is now in the oven. Here's hoping for no cracks so that Del will be impressed with my wizardry in the kitchen.

Thanks for the inspiration, Johanna!

29 April 2008

Still Uninspired

Well, Joanna, you never cease to amaze me. Your linky list is awesome! Of course, I look at them and think to myself, "Oh, how cute! Joanna should make that." or "Oh, that's sweet. I bet Marie would love to knit that." Never, "Wow! I just have to try that!" Yeah...not happening here. I did get inspired to try one new thing - making a sugar free cheesecake. It's actually not sugar free though because it has some canned dulce de leche in it. That has sugar. Lots of sugar. Anyway, I'll put the link in case cheesecake inspires any of you: Dulce de Leche Cheesecake. I made it to eat tonight for my birthday. My kids think it's too weird if I have no "cake" for my birthday. This is my consession to them. There was a problem though, it has huge cracks all through the top. I know that a slight crack is common in a cheesecake. But what causes multiple cracks? Anyone?

17 March 2008

Happy St. Patrick's Day!

I actually did some sewing!! I haven't really done any sewing other than work since Christmas, so it is about time! I made pajama pants for the whole family. The boys picked out the fabrics and were so excited when they got to wear them last night. This morning, I made green pancakes and green scrambled eggs too. They wouldn't eat the eggs, but the green pancakes were a hit! In the picture, you cannot see the green in the pancakes really well because the outsides turned brown, but the insides were bright green!


I decided to spare you the picture of me and Jerry in our pajamas, but here they are folded on the bed! I am a bit frustrated with the pattern I used for these, because they turned out so much bigger than the measurements on the pattern. I will have to alter them.

I also wanted to show you all a few shots from Ethan's birthday party this past weekend. He wanted an Ohio State Buckeye party, so I made the cake and we all wore team colors! He had a blast. Here is my very big boy at his party:

14 February 2008

Happy Valentines Day!


Happy Valentines Day!


On a totally unrelated note, I made Joanna's Challah bread recipe yesterday! One word - yummy!

28 January 2008

Best Pita and Flatbread

Do you like Middle Eastern food? Not too long ago I really disliked it and would turn up my nose at the hummus my mom was always eating. I could never figure out why the Snyder side of my family ate Middle Eastern food all the time. Turns out my great-uncle is Lebanese. That would explain a few things. I have really developed a taste for hummus, kibbeh, tabbouleh and many other traditional Middle Eastern foods. It's especially fun now since much of what Ella and I are studying in history focuses mainly on the Middle East and so as a project for history we make foods they used to eat and still do to this day. Of course, you couldn't have hummus without pita, right? Well, I finally found my favorite recipe and coincidently this same recipe makes delicious flatbread; you just have to cook it differently than pita.

1T active dry yeast
1 T sugar or honey
1 1/2 cups warm water
2 t salt
4 cups flour
1 T olive oil

Combine 1/2 cup of the water with the sugar or honey and yeast, whisk and let stand for 10 minutes. Dissolve the salt in the remaining 1 cup of water. Add the salt water and flour to the yeast slurry. Mix it up and then dump it out onto your counter and knead for about 10 minutes or so. Put the dough back in your bowl and add the olive oil. Knead the dough until the olive oil in well incorporated into the dough. Put the bowl with the dough into your oven which is OFF and set your timer for 90 minutes.

After your timer goes off your dough should look like this.
Take the dough out of the oven and punch it down. Divide the dough into twelve portions and put them into neat little balls like this.

FOR PITA:

Preheat your oven to 425. Roll out your dough and put the dough discs on a lightly oiled (spray is fine) cookie sheet. Put them in your oven on the lowest rack for about 8-10 minutes. When they are puffed up like this take them out of the oven. They should not be brown yet.
Heat a pan on your stove to medium. Coat lightly with oil or spray oil and put the pita in for about 45 seconds to 1 minute and then turn. You just want to brown the outside a little bit. When you cut them in half the pita pocket shows up.

FOR FLATBREAD:

Heat a pan on your stove over medium heat. Coat lightly with oil or spray oil. Roll out each ball of dough so you get a disc and cook the discs in the pan for about 2-3 minutes per side. When it gets bubbly then you know to flip it over.
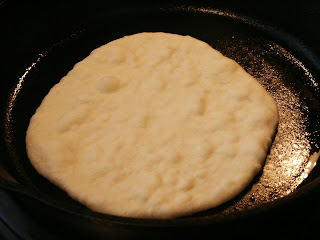
That's it. Easy, fast (for bread), yummy and super versatile!

20 January 2008

Best Challah Ever

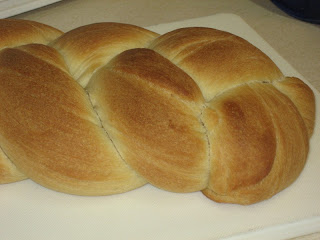
By far my favorite bread is challah. It is so soft and tasty and then makes delicious french toast if you can't finish it off (not likely). It is a sweeter bread so it's not so good for dipping in your soup, I guess, but I've dipped it in an onion au jus before and it was sublime! I have tried a good 6-8 different challah recipes and this is the one that stole my tastebuds. I got it from the FoodNetwork, but it was a temporary recipe so I can't just link you there anymore.

I don't have even a mixer, so I make all my bread by hand. It might seem intimidating at first but really, it's easy and the more you do it the more comfortable you will be with the dough and you will love the satisfaction of having made your family fresh bread.

I *HIGHLY* recommend that you begin making this bread the night before. We'll talk about why in a bit. So, onward and offward.

1 envelope or 2 1/4 t. yeast
3 3/4 c. flour (the recipe calls for bread flour but I've never used it)
3/4 c. warm water (no warmer than 110 degrees or you'll kill the yeast; been there, done that)
2 large eggs
1/2 c. vegetable oil
1 1/2 t. table salt (although I do use sea salt)
1/4 c. sugar

In a big bowl, whisk 3/4 c. of the flour and the yeast, then add all the warm water and whisk until it's smooth. Walk away for about 5-10 minutes, or until the yeast starts blooming, puffing up and seeming to grow (this is called proofing your yeast). If it doesn't puff up, you have one of two problems: 1) you killed your yeast with water that was too hot, or 2) your yeast is way too old. In the case of the former, start over with not quite so hot water, in the case of the latter, throw away your ancient yeast and go to the store and get new yeast.

After your yeast has proofed add the eggs, oil, salt and sugar and whisk until the salt and sugar have dissolved. Add the rest of the flour and begin incorporating it with your beloved spoonula or, if you live in a cave, a wooden spoon. After a while it will get too hard for you to mix and you will need to ditch the spoon and use your hands. When this happens dump the contents of the bowl onto your counter and knead it for anywhere from 5 - 10 minutes. Try not to add too much flour while you are kneading. You want your dough to be nice and smooth (mostly) when you make it into a ball. When you are satisfied with the look of your dough, set it on the counter and go wash out your bowl and your hands. Dry the bowl off and spray it with some sort of spray oil (I use olive oil spray) or coat it with some oil. Get your lump of dough and put it in your bowl and either spray the top of the dough or turn it around in the oil that you've coated the bowl with so that all sides of the dough are covered in oil (this is so the dough doesn't stick to the bowl or plastic wrap). Cover with plastic wrap and put your bowl of dough in the refrigerator and leave it over night.

OK, let's talk about why you're doing this at 10 at night instead of 10 in the morning. I've learned that a lot of the flavor in bread comes from letting the yeast...develop. If you only give it a couple of hours before you bake it, your bread will just be mediocre, but let it develop over night and all the next day and your bread will be delicious. I have found that this is especially true with pizza dough.

The next morning about 8 or so, take the bowl of dough out of the fridge and set it on your counter and just forget about it. The dough may have risen some over night but probably not a lot. Over the course of the next several hours it will come to room tempreture and rise more. Once it's risen so that about 1" of it is peeking over the top of the bowl punch it down and make it back into a ball, but don't be too mean to it. It's figurative when they say punch it. Preheat your oven to 350.

Now cut the dough into three parts using just your hands or a knife, whatever you prefer. You are going to roll each of the three parts out into a log that is about 12-18" and braid it, just like you would your hair, on whatever sheet you are baking the bread on. Let it rise for about 30 minutes or so (the heated/ing oven will help the dough to rise so leave it on).

At this point you can glaze it with an egg wash if you want and put some sesame seeds on it...I don't.

Bake the bread at 350 for 25-30 minutes for starters. I like checking the internal temp for done-ness (about 210 degrees) but don't let it overbake. If it doesn't look done, bake it for another 5 minutes at a time; it'll be a nice golden brown. When it's done, take it out and off the baking sheet and let it rest for 10 minutes. *DO NOT CUT IT YET* If you do, the bread won't be quite as soft and moist because a lot of the moisture will evaporate.

There you go...the best challah ever.

17 December 2007

Sugar Free Biscotti

So the biscotti that Joanna made looked really good to me and since I have heard the biscotti are not super sweet, I wondered if they would still be good when made with splenda. I have never had any biscotti before, and so I really have nothing to compare it to. They were good, but I don't think I will make them all the time. I really didn't love them. They turned out as far baking okay without the sugar - the flavor was okay, too. I guess I just like something softer, sweeter...who knows! They are much better dunked in the coffee, and ice cream is always good (sugar free, of course!). Anyway, here's a picture of how it looked.

15 December 2007

Let's Talk About Food

Winter, Christmas specifically, does something to me. It makes me want to bake and make yummy things and have the house smell like cinnamon and vanilla. Here are just a couple of things I've made recently that give me warm fuzzies.
Crepes. Real crepes. They are easy to make but take a lot of time, but it's so worth it in the end. You can warm up your favorite jam or preserve in the microwave, spread a bit on, roll it up and enjoy. Make it look festive and sprinkle some powdered sugar over them and top with fresh strawberries. Yummy! The link is to Alton Brown's recipe; I used Mark Bittman's from his cookbook How To Cook Everything.

Almond Biscotti. Oh, most yummy of yummy coffee goodness. These are actually very easy to make and way more worth the dollar you'll spend on all the ingredients for them combined, than the dollar or more you'll spend on one at the store.

Now, go, make some biscotti and coffee and snuggle under a blanket with a good book because I know the rest of you all are freezing your toes off.

07 November 2007

Christmas came early for me


So my mom sent me this Kitchen Aid mixer that was my Tutu's (Grandma in hawaiian) and she had it for a while but was not using it and I have been wanting it. She remodeled their kitchen and did not see the room for it so she decided that I would use it more and she sent it to me! I am SO happy! My Tutu bought this mixer in 1972 and I remember making homemade pasta and cokkies and bread with this exact mixer! It also came with a real copper bowl that inserts into the regular bowl that is great for whipping egg whites! I feel so happy now I will be able to make cookies and it will be so much easier to do this! I have been begging for one for years...ask Derrek, he is so glad to not have to hear me beg for one anymore! Plus it has a TON of sentimental value to me! maybe someday when we (finally) decide to have a child I can pass this down to them as my tutu and mom did for me!

20 October 2007

The Crafting Never Ends

At this point you guys must be thinking that all I ever do is sew. Well, to tell you the truth we've had our first vacation week from school so we've just been slacking off all week. It's been fun, but come Monday it's back to the business of learning.


My spoonula and I made this tasty dish last night: an overnight coffee cake that I will never make again due to the 3/4 cup of butter and 1 3/4 cup of sugar the recipe called for. It was good but not healthy!


You may notice the cute pink napkin there. That's my project for today. I have been mulling over making napkins for quite some time and I notice that my girls are constantly wiping their mouths on their shirts even if they have paper napkins so I thought if I made some super cute cloth napkins that they might be more motivated to save their shirts. I took them to Joann's and let Ella pick out the fabric. At first I was horrified by her choice but in the end, I think they make darned cute napkins!


The other thing I'm working on are these totally cute pumpkins I saw Eleanor Burns make on her show Quilt in a Day. It's easy as pie to make, just one seam and some light gathering and stuffing and you're done, basically. I'm going to make at least a dozen of these so that my grandma can sell them at her community's craft fair. I think they can sell them for a couple of dollars a piece and all the proceeds will go to sending children with cancer at the local hospital to a camp to have some fun, a good cause I think. Cute, eh?

14 October 2007

A piece of this and a piece of that


Hello everyone, seems like a long time since I was here. I did some little cooking"crafting" projects this weekend. I finished my ball, but forgot to take a picture, but it looks pretty good for the first one. I also, made banana nut bread mini muffins pasta salad, and Derrek (yes, Derrek) made french dip sandwhiches. They were INCREDIBLE! YUMO! Anyways not much else. I found out on Friday at 4pm that I am getting transfered to another store starting Monday morning and now I have to commute 20 miles each way! I am kind of bummed, but I have heard nothing but good things about the store, and it also fills less prescriptions in a day, so I will be able to breath and relax more! I just hope it all works out, I still will be going to the new store I talked about a while back, but for now this is temporary too. I just hope the drive is not as bad as I've know it to be. Ok, so I rambled on enough about that. Pretty much else I've been trying to relax!!!!! I am now going to attempt to make the puzzle ball with all the triangles, with my sewing machine, haha, this could be really funny! Oh, my book, I forgot to mention this cool book I got at Barnes and Nobles! I think I might have to use a project in here for my secret santa, since I am also know in my family as Miss Procrasinator. Thats all for now... I hope you are all doing well and enjoying your families!