Showing posts with label in the kitchen. Show all posts

06 December 2010

Christmas Gift Inspiration?

The Christmas gifts have started appearing under our tree!  Care to guess how many of these packages contain a handmade gift?

Yeah, that's right.  A big, fat ZERO.

Remember that one year that we all were making gifts galore and there were multiple posts going up here daily in order to showcase all the handi-work we were producing???  Wasn't that fun? Life has gotten in the way of my crafting.  Sure, I have ideas - but getting them into reality just isn't happening. 

I did pick up this paper crafting kit last January at Barnes & Noble on the "take an additional 75% off" table.  We are going to be doing these this week, as well as making snacks to take with us to our family reunion later this month. However, that is the extent of our creative Christmas making... So, instead, I am going to share some links of stuff I would make if I were making things.

10 November 2009

Homemade Beef Jerky

We recently got out my mom's dehydrator to make some jerky to take camping.  This is the best jerky I've ever had.  All it is is soy sauce and smoke flavoring; no funny spices or anything like that.  The liquid smoke comes in mesquite (seen here) and hickory.  It was hard to choose between the two.  We had a London Broil sliced 1/8 inch thin, marinated the meat for about 6-10 minutes in a mixture of 3 parts soy sauce to 1 part smoke flavoring.  You can adjust this to your taste buds.  We put them in the dehydrator for about 18 hours.  Any longer and it would have been too dry.  We'd probably even take them out earlier, but only by a couple of hours.


Yummy, jerky!!

26 December 2008

My Christmas Cranberry Tea...

Doesn't this just make your mouth water?!?!?!

It is super easy, but it has to be done beforehand, so prepare this in advance.
I actually started it at ten o'clock at night on Christmas eve, and finished it up at lunchtime on Christmas. This time I added the strainer to the sugar and water before I added the cranberries, since I don't own an actual strainer. But this worked really well, and I would do it this way again in a heartbeat....
Need the recipe???
Thank Joanna.

10 October 2008

Pumpkin, Pumpkin, Pumpkin

As soon as Joanna put up her post for Pumpkin Scones, and at the same time Pioneer Woman had up posts about making pumpkin puree and pumpkin butter, I knew I had to try some pumpkin things here! I have never made my own pumpkin puree - I always just buy a can at the store! But I was feeling adventurous and decided to go for it.

I started by cutting up the pumpkins (I got sugar pie pumpkins) and scraping the pulp and seeds out. I was so excited about this project! So imagine my dismay when I opened the second one and found this:

Rotten!! I was especially horrified because I bought these pumpkins at Whole Foods when I was in another part of town for a meeting. I wasn't about to drive 40 minutes back to Whole Foods for my refund, but man was it tempting. These pumpkins weren't cheap! So I only got to roast one pumpkin. After it roasted, I pureed it in my food processor.

I immediately made Pumpkin Butter. I love it - so yummy. But the recipe makes so much more than I thought it would. And it had too much sugar and not enough pumpkin or spice, for my liking anyway. Look how great this turned out:

Don't you just want to take a big bite of that toast right now? Actually, I wish you could. I'll never finish all this pumpkin butter before it goes bad. Do you think I can freeze it? I didn't know with the yogurt in it if it would freeze okay or not.

If you are wondering about the yield from one pie pumpkin, I used about 1 1/2 cups for the pumpkin butter, separated out the 1/2 c up I'll need for Joanna's scone recipe, 2 cups to make my favorite treat which is basically pumpkin pie filling cooked in an 8X8 glass dish without a crust. I serve it up in squares with fresh whipping cream on top! Mmmmm...and I don't feel so guilty about eating it, since without the crust it is fairly healthy. It's a vegetable, right? Anyway, after portioning out all of that, I still had 1 1/3 cups left.

So, in total, I got 5 1/3 cups of puree. The pumpkin butter is good, but the real test for me will come when I make the pie filling. I want to see if the flavor/texture/quality is really better. Enough that it could justify the extra cost and work from buying canned. If I do think it is enough better, I am going to try some larger, cheaper varieties of squash to see if I still like the results. I did some research, and it seems that most canned pumpkin is actually butternut squash! Who knew?

Of course, I saved the seeds and roasted those up, too. Wow, are they tasty. How long do you think this one, small bowl will last??? I really needed that second pumpkin!

11 June 2008

My sad Kitchen

My stocked pantry is in such a sad state. You know how I know this??? We don't even own a drop of soy sauce. I know... cause I have looked since lately I have been craving fried rice.... and an essential ingredient in fried rice is well soy sauce.

So then I thought, well, how is it made??? The wikpedia says that it is fermented soy beans and other stuff, well sorry, if I am out of soy sauce I am surely out of soy beans especially the fermented kind.

15 May 2008

My New Decor


Haha here are some pictures of my onions in panty hose. They look almost decorative. So I did a little research yesterday and had found the same tips about stringing them up like this. I'm just not really sure where to hang them. Cool, dry, well ventilated, and dark. Who has an area like this in their house?? Right now they're in my kitchen, but I can move them if I can come up with another place. I've already used about a third of the bag I got over the past few days. Here's the recipe I found and cooked tonight. It was quite good, but that's probably to be expected with the cream and cheese :)
Sweet Onion Casserole
  • 1 pound sweet onions, sliced into rings
  • 1 egg, beaten
  • 1 cup heavy cream
  • 3/4 teaspoon salt
  • 1/2 teaspoon ground black pepper
  • 1/2 cup shredded cheddar cheese

Place onion slices in a medium saucepan; cover with water. Bring to a boil; boil for 1 minute. Drain onions; transfer to an 8-inch square baking dish. In a small bowl combine egg, cream, salt and pepper. Pour mixture over onions. Sprinkle with cheese and paprika. Bake for 25 minutes at 350 degrees. Serves 6.

14 May 2008

Kitchen Frustration

Why is it that the more I make a recipe, the worse it turns out? Why does it seem like I must use a brand spanking new recipe every time I make something for it to turn out well? Maybe it's God teaching me how to FOLLOW DIRECTIONS. Yeah, that's what it is, I'm going with that.

09 May 2008

Rhubarb Galore

My Aunt Nancy lives on a large-ish piece of property in Washington state. She'll write emails with neat things like, "A baby horse was born in the barn this morning." It's kind of exciting. She grows things on her land, too. Like rhubarb. LOTS of rhubarb. I got a package in the mail and it had about 10 or 15 pounds of rhubarb in it. What do you do with all that rhubarb? Well, this is what I did with mine.
- washed and chopped into whatever size piece I wanted.
- found 5 great recipes here, here, here, here and here
- bagged the rhubarb and sugar needed for each recipe, plus the recipe itself which I put into a smaller zip type bag to protect it from the rhubarb juices.
- now they're in the freezer ready for any time I feel like eating rhubarb for dessert.


- made one for dessert tonight.

YUM!

30 March 2008

Forget the Birthday Cake, Gimme Some Pretzles

Two days ago I actually woke up reminding myself and two days ago I still forgot. Last weekend, I was there in her very presence and I still forgot. Happpy birthday, Meagan, I'm sorry I forgot.

Everyone is sick here. You should see the ick coming out of noses; it's gross. So we're staying in. Del got out a 3-D puzzle to do with the kids and they wanted a snack so I made these absolutely delicious soft pretzles! Can you say YUM-O?

I've made a list and I'm checking it twice. I am going to make in this order:

- 2 pairs of pajama pants each for Elena and Katherine
- samples for Marie
- a dress for Rachel
- a shirt for me
- a dress each for Ella and Sarah
- a skirt for me

*Can you tell the patterns at Joann's were 99 cents?

I am also considering making a pair of pajamas for my grandma for her birthday in April.

06 March 2008

Black Bean and Tomato Quesadillas

I want to share with you all one of my favorite, easy, meatless recipes! I know half of you glazed over as soon as you read the word "meatless," but please read on! I am just as much of a carnivore as the next person and I really enjoy good meat, but sometimes it is good to get a meal that has more fruits and veggies. And it is economical! So here it is:


Black Bean & Tomato Quesadillas
  • 1 can diced tomato (I like a diced fire roasted tomato), drained
  • 2/3 cup black beans (rinsed if canned)
  • 2/3 cup frozen whole kernel corn, thawed
  • 1/3 cup chopped onion
  • 2 Tbsp chopped fresh cilantro (I frequently used dried)
  • 1/4 tsp garlic salt
  • 1/4 tsp ground red pepper
  • 1 Tbsp lime juice
  • 1 1/2 c. shredded cheese
  • 6 flour tortillas

The first thing you do is mix up all the ingredients except for the cheese and tortillas in a bowl. This makes a really yummy salsa that is good for many things. I use it with tortilla chips or on top of a salad for a mexican salad lunch. This also gets better with time, so make it the day ahead if you remember, and be sure to save any leftovers when you are done assembling the quesadillas for another use!

After the salsa is prepared, heat a pan on the stove over medium heat and put some good ol' butter in it. This makes the quesadillas nice and brown and crispy on the outside and adds some great flavor to the tortillas. Once the pan is hot, lay a tortilla in it and top one half of the tortilla with a small handful of cheese.


Top this with about 1/4 cup of the salsa mixture. I also like to put a little bit of cheese on top of that before folding it over so that when I flip the tortilla, there is melted cheese on both sides keeping it closed. And, how can you go wrong with more cheese??

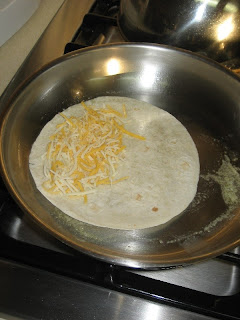
Fold over the other half of the tortilla and do another one on the other side of the pan. Let these brown for about three minutes on each side until the cheese is melted and the salsa is warm. A tip -when you flip these, lift the open side, not the folded side, to keep as much of the salsa in the tortilla as possible! Remove the finished quesadillas to a warm oven to keep them yummy while you make more! If you cover these to keep them warm, they will get soggy!


When these are done, they will look like this:
Cut them into wedges with your trusty pizza slicer and enjoy! I like to serve these with a hearty fruit salad!

How yummy is that?? Start to finish, this meal only takes about 20 minutes, so it is perfect for a busy weeknight!

29 February 2008

Creativity in the Kitchen

I am going to follow the trend of mostly kitchen posting here! Thank goodness for Meagan, who is still using her sewing machine these days! I finally used up some of that meat in my freezer. I thawed out the pork roast and made some scrumptious Barbecue Pork Sandwiches! Thank you Tina, for the idea! Even though this is a super simple supper, it was really nice and I would not have thought of it myself. For some reason, in my brain, roasts have to be eaten sliced or chunked with gravy! Because my crockpot did most of the work on this one, I made my own sandwich rolls! Homemade bread, good pork, Sweet Baby Ray's BBQ sauce - how could you go wrong!

Last night, feeling triumphant from making this beauty from scratch, I made Chicken and Prosciutto Tortellini with Alfredo Sauce! ::grins:: Well, it sounded good, didn't it?

28 February 2008

A Cuisinart Kind of Day

Yesterday I spent the entire day in the kitchen. I made, with my Cuisinart, baby food, bread, bruschetta, sliced fresh fruit, cookies. We'll thoroughly discuss these cookies in the next post and if you don't make them you'll be sorely missing out.
The most delicious cookies on the planet. Are you drooling yet?
What's good about these thinly sliced fruits is that the kids don't mind the skin when it's so thin. They ate it all in about 5 minutes. The fruits are one apple, one peach and one plum.
The bruschetta. I used one tomato, 1/2 an onion, 3 cloves of garlic, fresh parsley, dried basil, kosher salt, red wine vinegar and olive oil.

As you can see, it doesn't look the best. Because it looked sort of funny and I'm not too fond of raw onion, I cooked my bruschetta.Here it is, topped with parmesean cheese. Total cooking time was about 14 minutes. If I was to make this again, I'd not put in the onion or at least use 1/8 an onion instead of half, and I'd hand slice the tomatoes so that they were more attractive looking. These were still very good and they disappeared quickly.

I made a couple of loaves of whole wheat bread. Not the best, but it sure was fast.
I didn't take pictures of the baby food because...it's baby food. The food processor sure does a good job of pureeing the food. I made a peach into baby food and butternut squash. Overall, I really like it and it makes being in the kitchen even more fun than it used to be!

26 February 2008

Cuisin-love

I tend to be a bit old fashioned, in case you hadn't noticed. I don't have a mixer...OK, so they sent a European-plug mixer, but still, I haven't replaced it. I mix everything by hand. I've even made meringue by hand. Now that's dedication. I don't have a blender. I mash potatoes with a fork. I knead my bread myself. Recently, I've julienned and shredded by hand. I figure if my ancestors didn't need all these new fandangled devices to survive in the kitchen then I don't either. Except for the waffle iron. So what?, you say. Exactly!

Whenever I go to a Korean restaurant I am served this delicious side dish that is Korean radish, julienned and it's sweet. As far as I can tell it has no name and there is no recipe. I really wanted to make this stuff and as it's not in my new Korean cookbook and I can't find a recipe online, I was just going to fake it. But the thought of julienning two whole Korean radishes really was very daunting. They sat there and sat there and sat there. They started to get soft. Eek, I better use them, eh?
-
OK, so today I tried to make some baby food for Lily. Green beans. For our wedding, Del and I were given a Chopster, a teeny little food processor. I've only ever used it to make my famous black bean soup...OK, famous may be over stating it a bit. Infamous may be better since I did drop an entire pot full of the stuff on my parent back screened-in porch. But, I digress. So, I tried to puree the green beans in my chopster and all it did was chop it. I guess that's why it's called a chopster. This is when I realized that I NEED A FOOD PROCESSOR. I am beginning to be a pretty decent cook and it's sad that I don't have one. Forget the "my ancestors" bit, let's get real in the kitchen!

I go to my doctor appointment and when I get home THIS is waiting for me!!! I can hardly stop using it! I can't believe I've been away from my beloved Cuisinart long enough to type this out. All this to say that I used my brand spanking new food processor to shred the radishes in 1.2 seconds flat and developed this recipe for a yummy Korean radish...salad, of sorts.

Korean Sweet Pickled Radish

2 cups Korean radish, julienned or shredded
1/2 cup carrot, julienned or shredded
1 T vinegar
2 T sugar
1 t salt
2 t wine
1 T mirin
-
Put it all in a bowl and mix it up. It's good almost right away, but obviously if you let it pickle a while the flavors are better. Enjoy!

12 February 2008

Sunday Roast on Tuesday

I have been dying to make a traditional Sunday Roast with Yorkshire Pudding and Roasted Potatoes ever since our discussion here about British food almost 3 months ago. I finally made my fully British meal tonight for dinner and it was great! I tried a new method for roasting my meat in which the meat is cooked directly on the oven rack with a pan below to catch the drippings. This worked really well for me because a) I forgot to get the meat in the crockpot early enough to slow cook it and b) my oven is too small for any roasting pan I have ever found (fortuntely I have two small ovens so I can still prepare a big meal like this!) I felt a bit funny about putting meat directly on the rack, but it worked great! The only problem is that it cooked faster this way and I ended up overcooking the meat. I like mine medium, and this was well-done.

Please ignore major cooked on spills...I ran the auto clean cycle as soon as the roast came out of the oven!

I found the recipes for the roasted potatoes and Yorkshire puddings on a really cool blog written by an Englishman who had a hard time cooking British recipes with American ingredients and adapted the recipes for us. I was going to use his recipe for the tatties and the puddings but I found a different pudding recipe that I felt was more reliable and I was thrilled with the results of both!


But I have to tell you that what made this meal great instead of just good was the gravy! I didn't have any Bisto, but the pan drippings that I didn't use for the puddings went right into the richest beef gravy I have ever made and it made this food perfect!

Doesn't it just make your mouth water?

20 January 2008

Best Challah Ever

By far my favorite bread is challah. It is so soft and tasty and then makes delicious french toast if you can't finish it off (not likely). It is a sweeter bread so it's not so good for dipping in your soup, I guess, but I've dipped it in an onion au jus before and it was sublime! I have tried a good 6-8 different challah recipes and this is the one that stole my tastebuds. I got it from the FoodNetwork, but it was a temporary recipe so I can't just link you there anymore.

I don't have even a mixer, so I make all my bread by hand. It might seem intimidating at first but really, it's easy and the more you do it the more comfortable you will be with the dough and you will love the satisfaction of having made your family fresh bread.

I *HIGHLY* recommend that you begin making this bread the night before. We'll talk about why in a bit. So, onward and offward.

1 envelope or 2 1/4 t. yeast
3 3/4 c. flour (the recipe calls for bread flour but I've never used it)
3/4 c. warm water (no warmer than 110 degrees or you'll kill the yeast; been there, done that)
2 large eggs
1/2 c. vegetable oil
1 1/2 t. table salt (although I do use sea salt)
1/4 c. sugar

In a big bowl, whisk 3/4 c. of the flour and the yeast, then add all the warm water and whisk until it's smooth. Walk away for about 5-10 minutes, or until the yeast starts blooming, puffing up and seeming to grow (this is called proofing your yeast). If it doesn't puff up, you have one of two problems: 1) you killed your yeast with water that was too hot, or 2) your yeast is way too old. In the case of the former, start over with not quite so hot water, in the case of the latter, throw away your ancient yeast and go to the store and get new yeast.

After your yeast has proofed add the eggs, oil, salt and sugar and whisk until the salt and sugar have dissolved. Add the rest of the flour and begin incorporating it with your beloved spoonula or, if you live in a cave, a wooden spoon. After a while it will get too hard for you to mix and you will need to ditch the spoon and use your hands. When this happens dump the contents of the bowl onto your counter and knead it for anywhere from 5 - 10 minutes. Try not to add too much flour while you are kneading. You want your dough to be nice and smooth (mostly) when you make it into a ball. When you are satisfied with the look of your dough, set it on the counter and go wash out your bowl and your hands. Dry the bowl off and spray it with some sort of spray oil (I use olive oil spray) or coat it with some oil. Get your lump of dough and put it in your bowl and either spray the top of the dough or turn it around in the oil that you've coated the bowl with so that all sides of the dough are covered in oil (this is so the dough doesn't stick to the bowl or plastic wrap). Cover with plastic wrap and put your bowl of dough in the refrigerator and leave it over night.

OK, let's talk about why you're doing this at 10 at night instead of 10 in the morning. I've learned that a lot of the flavor in bread comes from letting the yeast...develop. If you only give it a couple of hours before you bake it, your bread will just be mediocre, but let it develop over night and all the next day and your bread will be delicious. I have found that this is especially true with pizza dough.

The next morning about 8 or so, take the bowl of dough out of the fridge and set it on your counter and just forget about it. The dough may have risen some over night but probably not a lot. Over the course of the next several hours it will come to room tempreture and rise more. Once it's risen so that about 1" of it is peeking over the top of the bowl punch it down and make it back into a ball, but don't be too mean to it. It's figurative when they say punch it. Preheat your oven to 350.

Now cut the dough into three parts using just your hands or a knife, whatever you prefer. You are going to roll each of the three parts out into a log that is about 12-18" and braid it, just like you would your hair, on whatever sheet you are baking the bread on. Let it rise for about 30 minutes or so (the heated/ing oven will help the dough to rise so leave it on).

At this point you can glaze it with an egg wash if you want and put some sesame seeds on it...I don't.

Bake the bread at 350 for 25-30 minutes for starters. I like checking the internal temp for done-ness (about 210 degrees) but don't let it overbake. If it doesn't look done, bake it for another 5 minutes at a time; it'll be a nice golden brown. When it's done, take it out and off the baking sheet and let it rest for 10 minutes. *DO NOT CUT IT YET* If you do, the bread won't be quite as soft and moist because a lot of the moisture will evaporate.

There you go...the best challah ever.

17 January 2008

Bulgogi For the Average American

I'm sure that this would be set down as not authentic Korean bulgogi, but that's O.K.; this is the way I like it, it's so very similar you can barely tell and it has all the same ingredients that every other bulgogi recipe I have ever seen has...so how's it different. For a different recipe, I like this one, but I've never made it with kiwi.

I find that the measurements really depend on your taste, so I'll give you mine and you can adjust to what you like. For this recipe you will need the following:

1/4 c. soy sauce (use REAL soy sauce , see scene 9)
1-2 T mirin (any sweet white rice wine will do)
1 1/2 T sesame seed oil
3 green onions
3 cloves garlic
1/4 to 1/2 purple or white (traditional) onion
sesame seeds
1 scant T sugar or to taste, you do need *some* sweetness
and of course the beef, about two pounds; let's discuss

The beef is generally sirloin cut very thin, like less than a quarter inch. In my experience, this is because the meat will accept the flavors better when it's so thin; with a thicker cut instead of tasting the bulgogi marinade, you taste beef. Not all in all a bad thing, especially if you use good beef, but not authentic bulgogi. If you have an Asian food store near you (sorry Tina) they have it there, if not get your butcher to cut it thin or buy fajita or stir-fry meat; it's not thin enough, but it'll do (this is what I have for what I made today).

In a medium-sized bowl combine the soy sauce, mirin, sesame oil and sugar and whisk until the sugar is dissolved or at least nearly so. Put a rough chop on the garlic and add that. Slice green onions and add those (I save some of the greens for a garnish later when it's all done) and then thinly slice the onion so you have half rounds. Add the onions and meat to the concoction and mix it all up. Put it in the fridge for about an hour or so. Meanwhile, cook some rice.

Over medium heat cook the entire concoction (juice and everything) until the meat is done and the sauce has reduced. Traditionally bulgogi is cooked over hot coals, like a barbecue (I know, old hat for some of you) but I more often than not get it this way when I go to a Korean restaurant these days. Serve with rice and kimchi. How's that for yumminess?

On a totally different note, check out these breadsticks I made. I absolutely adore the way baking bread makes my house smell.

19 October 2007

Ode To My Spoonula


I think I'll write a poem or tune
About a tool that's both spatula and spoon;
And when I think of it, it makes my heart swoon.
My beloved Spoonula.

Whether cooking or baking, it's the first thing I snatch;
For scraping or stirring, it's utility's unmatched.
I'd let you borrow it, but there's just one catch,
It's my beloved Spoonula.

The only thing better would be if I had two
'Cause if I lost this one I wouldn't know what to do.
One thing's for certain, I'd be very blue,
Without my beloved Spoonula.

Hmm, I think I'll go bake something.


*Thanks to my most wonderful husband Del for the poem.